
REVIEW · CITY TOURS
Copenhagen City Of Lights PhotoWalks Tour
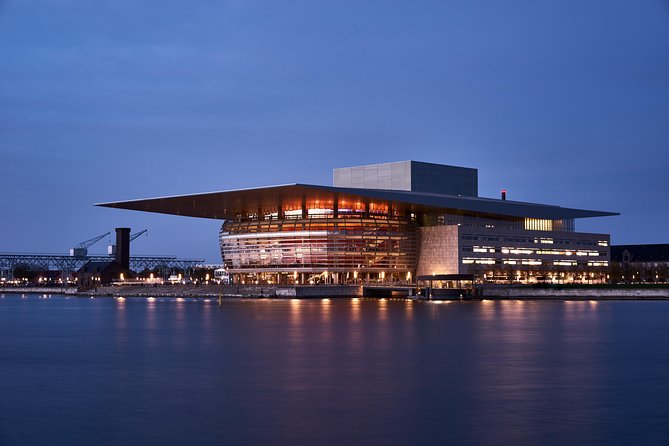
Copenhagen looks different after sunset. This private City of Lights photo walk is built for the moment between blue hour and full night, when the city glow turns streets into a photography playground. You’ll practice night photography techniques with a pro photographer guide who focuses on helping you get images you actually want to take home.
I especially like that the tour is private, so your guide can slow down, explain, and tailor directions to your camera and comfort level. You also get hands-on coaching for composition and exposure, including manual camera basics like aperture, shutter speed, ISO, and how to use long shutter speeds for real night scenes.
One heads up before you go: the timing can feel lighter than you expect. Copenhagen can stay bright late, so if you come chasing total darkness, you might need to embrace a mix of glow and lingering daylight.
In This Review
- Key highlights worth prioritizing
- Why this City of Lights photo walk works for night photographers
- Private time, up to 3 friends, and why that matters for value
- The 3-hour “night” window, and how to plan around Copenhagen light
- Bring your tripod, then use it with confidence
- Meeting point and ending point you can find easily
- Stop 1: Photo exploring where the city glow turns magical
- The Royal Palace area and how to photograph iconic facades at night
- Opera House and Parliament: using angles when the lighting gets tricky
- How the photography lesson actually shows up in your photos
- What the professional photographer guide does for you in real time
- Weather, walking pace, and what to wear
- Practical logistics: English, mobile ticket, and how long you’ll be out
- Price and value: what you get for $233.63
- Who should book this photo walk (and who might not)
- Should you book Copenhagen City of Lights PhotoWalks?
- FAQ
- How long is the Copenhagen City of Lights PhotoWalks tour?
- Where does the tour start?
- Does the tour stay near public transportation?
- Is the tour private?
- Can I bring friends or family?
- What language is the tour offered in?
- Do I need a tripod?
- What should I wear?
- Where does the tour end?
- What is the cancellation policy?
Key highlights worth prioritizing
- Private guide time focused on your camera, your questions, and your pace
- Manual settings coaching with practical tips for aperture, shutter speed, and ISO
- Long-exposure practice to capture true night atmosphere and light effects
- Classic Copenhagen photo stops like Nyhavn, the Opera House, and the Parliament area
- Composition help on the move using perspective, lines, and color
- Tripod required so you’re ready for longer exposures when the light drops
Why this City of Lights photo walk works for night photographers
Copenhagen at night has that soft, layered feel photographers love. The sky shifts from blue to darker tones while streetlights, windows, and landmark lighting begin to take over. That is exactly the sweet spot this walk is designed for, since you’re photographing both the transition and the finished glow.
What makes the experience valuable is that it’s not just a photo stroll. You’re learning how to make the light behave. The guide’s focus on exposure, composition, and long shutter techniques means you’re not guessing. You’ll learn how to control the look instead of just pointing and hoping.
You’ll also leave with more than a few shots. The coaching includes tips for post-processing too, which helps if you want your images to look like what you saw, not like a phone photo that got confused by bright lights.
More of Copenhagen, reviewed one tour at a time
- Copenhagen: Canal Cruise with Guide
★ 4.6 · 9,115 reviews - Copenhagen: Hop-On Hop-Off Bus Tour with Boat Tour Option
★ 3.9 · 4,122 reviews - Private Walking Grand Tour of Copenhagen
★ 5.0 · 3,953 reviews - From Copenhagen: Lund and Malmö 2-Country Tour
★ 4.7 · 2,772 reviews
Private time, up to 3 friends, and why that matters for value
At $233.63 per person, this is not a casual bargain tour. The value comes from the structure: it’s private, and your guide can concentrate fully on you. Even though it’s private, you can bring up to 3 friends or family members in the price, which is a smart way to share the cost while still keeping the group small.
Small groups are not just a comfort perk. They change the whole learning curve. When you’re practicing long exposures and manual settings, you need time to adjust. You also need someone watching your framing and your exposure choices as conditions change.
The price makes sense best if you fall into one of these buckets:
- You want a pro’s feedback, not just a route through famous sights
- You want to build confidence with a camera you already own
- You’re traveling with a tripod and want to use it effectively, not awkwardly
If you’re only looking for a few easy snapshots and have no interest in exposure settings, you might feel the cost faster than you expected.
The 3-hour “night” window, and how to plan around Copenhagen light
The walk runs about 3 hours, and it focuses on the time just before sunset through the shift into night. Here’s the practical catch: Copenhagen can stay bright later than many places. So even during a planned evening photo window, you may still be dealing with mixed lighting.
That actually can be a gift for photography. Blue hour plus city glow can produce color gradients and softer highlights. But it can also be frustrating if you came expecting pure darkness and heavy light trails.
My advice: treat this as a “light transition” session, not a “turn the lights on and it’s pitch black” session. If you want the strongest night look, ask your guide early about how to time your long exposures during the darker moments.
Bring your tripod, then use it with confidence
This tour requires a tripod for longer exposures. If that sounds like a hassle, it might be, but it’s also the tool that makes night photography click. Without it, long exposures become blurry and inconsistent, especially around moving people and shifting light.
What you should expect from the lesson:
- You’ll learn the relationship between shutter speed, aperture, and ISO
- You’ll get guidance on long shutter speeds based on the scene in front of you
- You’ll practice composition choices that work at night, like perspective, lines, and color balance
If you’ve never used a tripod in the evening, don’t panic. The coaching is designed for both newer photographers and people with years of experience. The key is to be ready to try. Even a simple sequence of settings trials can turn a dull frame into something dramatic.
Also dress for the weather. The walk operates in all weather conditions, so bring layers and something warm for your hands. Cold fingers are real. They make camera buttons feel like they’re in another zip code.
More Danish city tours we have written up
- Copenhagen: 3-Hour City Highlights Bike Tour with Guide★ 4.7 · 1,239 reviews
- Copenhagen: Group Walking Tour – City Highlights – 2 Hours★ 4.7 · 1,088 reviews
- City Sightseeing Copenhagen Hop-On Hop-Off Bus Tour★ 3.5 · 800 reviews
- 3-hour Copenhagen City Highlights Bike Tour★ 5.0 · 757 reviews
- Copenhagen: City Sightseeing Hop-On Hop-Off Bus Tour★ 4.3 · 709 reviews
Meeting point and ending point you can find easily
You start at Memorial AnchorNyhavn 1F, 1051 København, Denmark. That matters because you’ll likely need to get your tripod set up early and not waste the first part of the walk.
The tour ends back near where you started, at the Metro area at Kongens Nytorv. Expect to walk and reposition a lot, since good night photos often require multiple angles and small shifts of distance.
The tour is offered in English, and you’ll get a mobile ticket. Confirmation is received at booking, which helps you plan your evening without last-minute scrambling.
Stop 1: Photo exploring where the city glow turns magical
The walk starts during the transition period, when the city begins to change character. This is where you learn to see the difference between ordinary street lighting and photo-ready lighting.
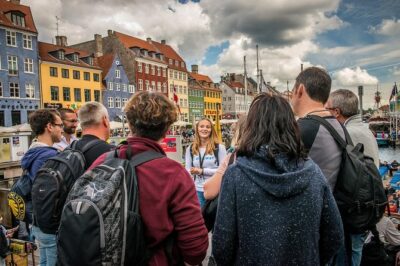
A key early target is Nyhavn, with its old buildings and the lights coming on. Nyhavn is perfect for the kind of coaching this tour is built around:
- You can practice framing with strong lines and repeating shapes
- You can work with color from window lights and signage
- You can use longer exposures to change how water and reflections behave
Nyhavn is also a good “first classroom” because it gives you lots of light sources to work with. The challenge is that bright highlights can blow out if your exposure is too aggressive. This is where manual settings guidance pays off. You’ll learn how to balance enough light for the scene without washing out key details.
The best part is that this isn’t a single-photo moment. Your guide’s job is to help you build a small set: one wider establishing shot, a tighter detail shot, and a framed composition that uses the scene’s lines to lead your eye.
The Royal Palace area and how to photograph iconic facades at night
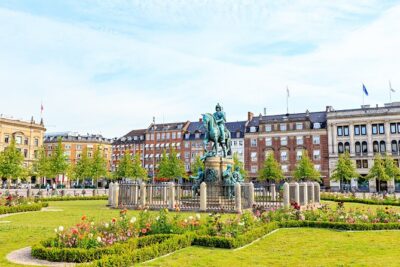
After Nyhavn, you’ll work your way toward major landmarks, including the Queens palace area. At night, palace-style architecture can look either flat or dramatic depending on your approach.
Here’s what you’ll focus on during stops like this:
- Composition that uses verticals, symmetry, and edges
- Exposure choices that keep the building readable, not just a bright silhouette
- How to keep the sky and surrounding lights from overpowering your subject
Facades also give you options for perspective. If you shoot from too far back, the subject can shrink into the surrounding city glow. Too close, and you lose the context that makes the landmark feel “place-specific.” Your guide will help you find that balance.
Opera House and Parliament: using angles when the lighting gets tricky
Two of the biggest drawcards on the route are the Operahouse and the parliament area. Landmark lighting often creates a mix of strong highlights and darker surrounding areas. That means your settings have to work harder.
This section of the walk is where you’ll benefit most from learning how light affects your camera settings. Long exposures can make light look smooth and cinematic, but only if you keep control of exposure.
Your guide will help you with:
- How to choose an angle that keeps the subject dominant in the frame
- How to handle bright points of light without losing detail
- How to use perspective and lines to make the scene feel intentional, not random
One drawback you may notice: some landmark angles are more crowded at the exact moment a photo opportunity hits. This tour stays focused on technique and pacing, so you’ll likely reposition and wait for your best view rather than forcing one shot from a bad spot.
How the photography lesson actually shows up in your photos
The tour promises you’ll learn specific skills, and those skills matter because they explain why your results look different.
Here’s what the coaching is centered on:
- Manual settings: aperture, shutter speed, and ISO
- Creative composition using perspective, lines, and color
- Control and influence of light
- Tips and tricks for post-processing
- Long shutter speeds and how they relate to the scene
In plain terms, you’ll start thinking like a photographer instead of a camera button-pusher. You’ll learn how to predict what happens when you change one setting, which is what makes repeat shooting easier on future trips.
Post-processing tips are also useful. Night photos can look great in-camera but still need minor correction later. Even basic edits can improve contrast, tone down overly bright areas, and bring out details in architecture and reflections.
What the professional photographer guide does for you in real time
A pro guide is not only a walking companion. On this kind of shoot, they’re also a technical translator.
In practice, your guide helps with:
- Composition tweaks, like adjusting your position and angle before you shoot again
- Exposure guidance, so bright lights don’t wreck your frame
- Camera setting adjustments for the current lighting level, not last hour’s lighting
The private format boosts this because your guide can spot what you’re doing wrong right away. If you’re struggling with manual settings, you can get patience instead of feeling rushed. If you already shoot manual, you can still get fresh ideas about framing and light.
The experience also has a strong confidence factor. Night photography can feel intimidating because results vary fast. With coaching, that intimidation shrinks.
And yes, this is exactly the kind of tour where patience matters. One practical lesson is learning how to slow down long enough to get the shot.
Weather, walking pace, and what to wear
The walk operates in all weather conditions, so you should dress for Copenhagen evenings, not for an optimistic forecast. Layers are your best friend. Bring gloves if you’re prone to cold hands, and keep your tripod packed so it’s easy to set up and stabilize quickly.
You’ll be walking between landmarks, and you’ll likely spend time at spots where longer exposures are required. That means plan to move steadily, not sprint.
The good news: most people can participate. It’s not described as a technical hiking route. It’s more about careful shooting and steady repositioning.
Practical logistics: English, mobile ticket, and how long you’ll be out
- Duration: about 3 hours
- Language: English
- Ticket: mobile ticket
- Group type: private, only your group participates
- Meeting point: Memorial AnchorNyhavn 1F
- End: back near the meeting area by Kongens Nytorv
If you’re coordinating with other plans that night, leave breathing room. Tripod shooting and manual settings take time, and this tour is designed around that reality.
Price and value: what you get for $233.63
$233.63 per person is a meaningful spend for a city walk. So what are you paying for?
You’re paying for:
- A professional photographer guide focused on technical coaching
- Private time, which reduces waiting and speeds up feedback
- A structured photography lesson, not just access to landmarks
- Long-exposure support, including the part where your tripod becomes a real tool
If you’ve ever tried night photography on your own, you know how easy it is to end up with blurry frames, blown highlights, or images that feel flat. This tour attacks those exact pain points with practical instruction during the shoot itself.
If you’re the type who loves learning by doing, the cost can feel fair. If you’re mostly hunting for quick sightseeing photos with no interest in settings, you might decide this money would go further elsewhere.
Who should book this photo walk (and who might not)
This tour is a great fit if you:
- Want a hands-on night photography lesson in Copenhagen
- Plan to bring and use a tripod
- Enjoy landmarks but want technique, not just photos taken for you
- Are new to photography and want manual settings explained in context
- Already shoot manual and want help refining composition and light control
You might want to skip if:
- You don’t want to carry a tripod
- You hate long periods of waiting for the right exposure moment
- You only want daylight-style sightseeing and are not interested in night exposure practice
Also, keep your expectations flexible about darkness. Copenhagen lighting can stay active late, so you’ll likely shoot in a mixed-light environment.
Should you book Copenhagen City of Lights PhotoWalks?
I’d book it if you want more than a route through famous Copenhagen spots. This tour is built for practical night photography: manual settings, long exposures, composition help, and a private guide who can adjust to your needs as the light changes.
The main reason to pause is the timing expectation. If you arrive fully expecting pitch-black night the whole time, you might feel misled by how long the city stays bright. But if you treat this as a blue hour plus glow session, that same condition can actually help your images.
If you bring a tripod, dress warmly, and show up ready to experiment, you’ll leave with stronger skills and pictures you’ll be proud of later.
FAQ
How long is the Copenhagen City of Lights PhotoWalks tour?
The tour lasts about 3 hours.
Where does the tour start?
The meeting point is Memorial AnchorNyhavn 1F, 1051 København, Denmark.
Does the tour stay near public transportation?
Yes, it is near public transportation.
Is the tour private?
Yes. It is private, and only your group participates.
Can I bring friends or family?
Yes. Up to 3 friends or family members can be included in the price.
What language is the tour offered in?
The tour is offered in English.
Do I need a tripod?
Yes. You are required to bring a tripod for longer exposures.
What should I wear?
The tour operates in all weather conditions, so dress appropriately for the weather.
Where does the tour end?
It ends back at the meeting point area, near Kongens Nytorv.
What is the cancellation policy?
You can cancel for a full refund if you cancel up to 24 hours in advance of the experience start time. If you cancel less than 24 hours before the start time, the amount paid will not be refunded.
More Tours Around Denmark
All Our Denmark Reviews
Copenhagen, Reviewed
Other Danish days out we have written up

City Tours, compared.
 ★ 4.73-Hour City Highlights Bike Tour with GuideFrom $551,239 reviews
 ★ 4.7Group Walking Tour – City Highlights – 2 HoursFrom $391,088 reviews
 ★ 3.5City Sightseeing Copenhagen Hop-On Hop-Off Bus TourFrom $45800 reviews
 ★ 5.03-hour Copenhagen City Highlights Bike TourFrom $54757 reviews
 ★ 4.3City Sightseeing Hop-On Hop-Off Bus TourFrom $44709 reviews
 ★ 4.61.5-Hour City Highlights Bike TourFrom $38477 reviews
 ★ 4.8Guided City Highlights TourFrom $75366 reviews
 ★ 4.9City Highlights Guided Segway TourFrom $82299 reviews
Browse the lists this tour appears in